{Home improvement goals}
Stencil accent wall in living room
Paint bedroom
Update some boring tree ornaments
Stain & paint Ikea bar cart
Spray paint a few items around the house
Refinish dresser
Try this update on our one folding chair
Convince Ces to let me get one of these to finish off our gallery wall
Reupholster dining chairs
{Relationship goals}
Patience
{Personal goals}
Blog consistently
Build up emergency fund stash
Drink like a responsible adult vs. a fish
The ubiquitous eat healthier work out often
Will be interesting to take a look at this list on December 31st to see how well I did.
Showing posts with label DIY. Show all posts
Showing posts with label DIY. Show all posts
Thursday, January 3, 2013

Thursday, October 18, 2012
DIY: Yarn Fall Wreath
You've seen them all over Pinterest the ubiquitous yarn wreath. I've been on an Autumn kick lately so I was game to try this super easy DIY project.
I went to Michael's to pick up a wreath form, hot glue gun, ribbon and some warm colored yarn. The bird I picked up from Pier 1 Imports and the fake flowers I had on-hand and are from Ikea.


I went to Michael's to pick up a wreath form, hot glue gun, ribbon and some warm colored yarn. The bird I picked up from Pier 1 Imports and the fake flowers I had on-hand and are from Ikea.

I marked off my wreath where I wanted the colors to change, hot glued the first piece and went to work wrapping the yarn tightly. I should note that its important to do all your gluing on one side of the wreath to keep the front looking smooth and pretty.

I finished it off by gluing a piece of ribbon to hang it and here it is hanging proudly on our front door.

I inadvertently matched the wreath to our red door and I am loving it!
What do you think? Will you be decorating with a yarn wreath this season?
Wednesday, September 5, 2012
Hogar: Dresser Makeover
I took advantage of the long weekend to tackle a dresser makeover. I have a much larger dresser that is in need of refurbishing but for my first project I decided to start with a more manageable piece.
I came across this tutorial from Love, Pomegranate House on how to paint laminate furniture so I set out to Home Depot ready to make-over my boring K-Mart laminate dresser.


The new look goes great with the rest of the bedroom and I am now feeling confident to refurbish the larger dresser!

I came across this tutorial from Love, Pomegranate House on how to paint laminate furniture so I set out to Home Depot ready to make-over my boring K-Mart laminate dresser.
 |
| Sanding paper, primer, paint, sealer, brushes and new knobs |
 |
| Before |
I started by lightly sanding the entire dresser, this makes little grooves and creases in the laminate which will make the primer and paint adhere better.
Next I applied one coat of primer with a bristle brush.


After the primer had dried, I applied 3 coats of Behr white paint allowing plenty of time for each coat to dry. Once the third coat of paint was dry I applied 2 coats of sealant to give it a smooth finish.

The last step in the makeover was switching out the old knobs for new glass ones.
 |
| After |
The new look goes great with the rest of the bedroom and I am now feeling confident to refurbish the larger dresser!

Thursday, August 30, 2012
Hogar: DIY Stencil Pillows
I've been wanting to update my drab lime-green Ikea pillow cover for a while now, the color is all wrong, and the plain linen is just boring. I came across Wit & Whistle's stencil pillow tutorial and loved the prospect of personalizing a throw pillow. I decided to add a step an treat the fabric with dye and hope for an even turquoise color, the dye job did not go so well and I was contemplating donating our cover to our local thrift store. I stayed put and after days of eyeing the blotchy pillow I decided the unevenness only adds to its charm. I was too impatient to trace out my letters with pencil first (a step that is highly recommended) but I did measure out the rows so that there was 1 inch of space between each line. I chose to quote the beginning of Todo Cambio by Camila which just happens to be mine and Ces song <3.


I'm loving the final result!
Friday, August 17, 2012
Hogar: Map Picture Frame
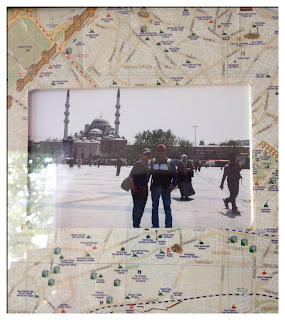
I want to share with you a quick and super easy way to update a picture frame. I'm curating a gallery wall for our living room (big reveal coming soon) and in searching for inspiration I came across this idea from Martha Stewart Weddings. I had an extra Istanbul city map from our trip to Turkey earlier this summer so I decided to give it a go.
 |
| Before |


 |
| After |
All you need is a frame with a mat, a box cutter, tape and a free map of the city of your choice. This is a great way to create a keepsake of your family's travels or even celebrate where you live!
Subscribe to:
Posts (Atom)